
MonPoc Purchase Guide - August 2022 [Tekk]
The main goals of this guide are to get you, as a new player, a well-balanced full army for as few purchases as possible while also leaving room to expand with you as you become more involved with the game.
STEP ONE: PURCHASING A STARTER (MSRP 49.99)
Your first step when buying into Monsterpocalypse is going to be picking up one of the starter boxes. Each Agenda has its own starter box, which includes a monster, 5 units, 6 cardboard Apartment Buildings, a set of dice, a double sided paper mat, and a set of rubble tiles.
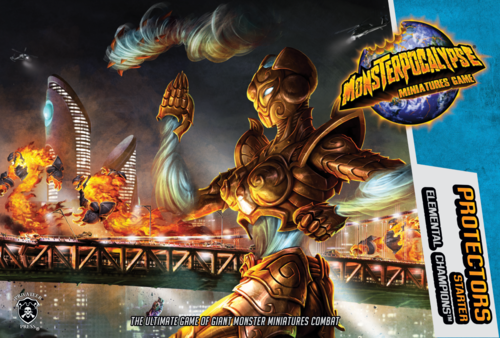
If you’re planning on starting with Protectors, pick up the Elemental Champions box. Hurricanius is an all-star high power monster with a very robust ability kit, and the Fire Kami unit is essential in any competitive Protector unit list.
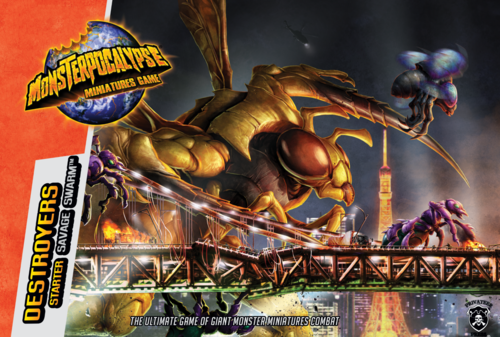
For Destroyers, the Savage Swarm starter comes with a fantastic specialist in the Spy Fly, and Dynastavus is a technical monster who trades fragility and a high learning curve for extremely aggressive damage output.
It’s important to note that even if you don’t intend to play with these monsters for whatever reason, a starter is still a must-buy. Starter boxes are currently the only way to get dice sets and rubble tiles, and the two paper maps included in the box are exclusive to the starters as well.
Finally, there is another set of starters built around the GUARD and Planet Eater factions, respectively, but these starters are out of print and are becoming increasingly difficult to find. If you happen upon a Gorghadra or Defender X starter, they’re valid alternatives, but given their rarity nowadays this guide is going to be going off the assumption you picked up one from the current pair.
STEP TWO: YOUR PAIRED MONSTER
Once you have your starter, the next thing you’ll need is a second monster. Although one monster games are a supported format, organized play is balanced around two monsters and you’ll get a much better experience jumping right in. These are a few community recommendations for strong monsters that work well in almost any list, meaning they’ll continue to hold their value even as your play experience level increases. Generally speaking, we recommend staying away from Unit General type monsters when making your first purchases because those monsters tend to require specific units to pair up with them, while our goal is to give you a toolbox of models that can be used in a wide variety of lists as you learn the game and discover your preferences.
PROTECTORS

Defender X ($34.99)
Defender X is a well rounded, hyper efficient support monster, boasting solid defenses, strong power generation, and the highly valuable and unique Command Matrix rule in his Alpha form. Command Matrix grants all allied models, not just ones that share Defender X’s faction, the Troubleshoot action, which allows you to reroll a missed attack once per turn. Because power attacks can deal upwards of a quarter of a monster’s total health, missing attacks in Monpoc can be absolutely devastating and can sometimes turn a win into a loss in a blink of an eye. Because of this, and his general lack of list-building requirements, Defender X is a very versatile partner that can fit into a large number of pairings. His main weakness, to balance this, is his relative lack of aggressive power, with only a short range Beat Back gun in hyper and below average boost dice.

Cassander (29.99)
Cassander is an all-rounder style monster with a focus on high dice efficiency. Cass can do all types of attacks well, and because of his Tooth and Claw and Penetrator special rules, he can make those attacks with well-above average accuracy even while low on power, often rolling more boost dice than even most hyper form monsters can. When he enters hyper, he also gains the powerful Beat Back rule on his blast attacks, which makes it almost impossible for enemy monsters to screen against him. While Cassander does have an insanely strong unit buff in King of Beasts and we recommended you avoid unit generals before, he doesn’t rely on this buff to be an effective monster. Even 1 or 2 Legion of Mutates units are plenty to get the most out of him. Cassander’s biggest weakness is that he has completely average defenses, with a printed defense of only 8 on both forms and no special rules to mitigate damage. While this isn’t a weakness, per se, it does mean that Cassander is more ‘fair’ than some of the other monsters in the upper echelons of the power curve.

Rastaban ($32.99)
Rastaban is a disruptive, power generating monster that can fit in just about any Protector list. In Alpha form, his Range 5 gun with Strafe is fantastic for destroying enemy power bases, and Power Swell makes your Draken units produce twice as much power when fighting enemy units, which takes your Berserkers to ludicrous power levels. With his ability to produce mountains of power dice and fight in the late game without assistance from his partner thanks to Swift Strike, Rastaban is all upside with very little in the way of weaknesses.

White Dajan (29.99)
White Dajan excels in playing forward and aggressive while providing a unique toolkit for players that have an eye for positioning. Whether it be through tossing the opposing monster or Flinging the occasional unit into buildings, Demolisher allows White Dajan to actively generate Power Dice by smashing buildings one way or another. White Dajan really begins to shine with abilities such as Steady and Suplex, which test a player’s positional awareness. In his Hyper form, White Dajan becomes a highly mobile monster that can skate across the board and position himself favorably with relative ease. High mobility, Beat Back, Sweeping Strike, and an additional speed allow Dajan to send an enemy monster flying and disrupt your opponents units while still giving you the opportunity to reposition yourself in a safe spot. Although White Dajan’s appearance may suggest a sluggish and straightforward monster, his expansive toolkit will provide player’s a wealth of opportunities to surprise opponents.

Tyrranix (27.99)
Tyrranix is a straightforward, power producing monster with an absolutely terrifying hyper form. The key to this dinosaur’s kit lies in the Fury trigger featured on his Power attack profile in both forms; Tyrranix generates an extra power die every time he hits with a power attack. While this may not appear to be a high impact rule at first glance, the amount of extra power Tyrranix can accrue over the course of the game greatly smooths out your resource curve when making attacks. Also worth mentioning: the Swat power attack is actually two, separate attacks that use the same dice pool, which means that Fury triggers twice when swatting. Swat one enemy unit into another and Tyrranix will give you four power dice! Once he goes hyper, Tyrranix also picks up the powerful Scatter action, which makes screening against him virtually impossible, and Crunch, causing all of his attacks to occasionally deal super damage.
DESTROYERS

Gorghadra ($34.99)
Gorghadra, the Planet Eater monster featured in the previous Destroyer starter, is still a very viable pick for starting players to check out. Gorghadra’s ruleset is primarily focused around generating fistfuls of power dice: in Alpha form, his Demolisher and Riled special rules generate a power die for each building he destroys and each attack he is hit by, respectively. In Hyper form, he gains Unearthly Rage, which extends the range of Riled to include every friendly model, and Annihilate, which causes all of his attacks to deal Super Damage. Gorghadra is an extremely straightforward monster, but all of his rules reward you for doing things a good player should be doing anyway, so he teaches strong fundamentals.

The Preceptor (29.99)
The Preceptor is an all-rounder monster with a versatile kit. good boost dice, a long-range gun, and a terrifying hyper form. Although you can play Preceptor with zero Masters of the 8th Dimension units in your force and still get great results, his Kinetic Distortion buff is a fantastic ability that takes the already strong Masters units you’ll want to be running anyway and puts them over the top. The Preceptor can perform well in just about any Destroyer pairing, but he will fully shine with a partner that can take advantage of his ability to choke out your opponent’s power die production, making for a methodical, controlled playstyle.

Mogroth (27.99)
Mogroth is a highly disruptive monster with a focus on dice efficiency and messing with your opponent’s power dice production. Mogroth has a very synergistic kit in which many of his rules work well in tandem. For example, in Alpha form, Mogroth’s range 5 gun, Divination buff, and Energy Cycle allow him to kill enemy securing units for very little dice investment, and in Hyper he gains Rapid Fire and Hit and Run [Blast] to turn that efficiency towards the enemy monster as well. Mogroth’s biggest weaknesses are his lack of high mobility and below average Power attack stat, but if you’re looking for a versatile monster with a focus on guns, Mogroth is an excellent pick.

Xixorax (26.99)
Xixorax is a high aggression monster with strong raw damage potential and superior power dice production. Rampager is a phenomenal ability for keeping your supply of red dice high even while your opponent is disrupting your power base, allowing a Xixorax player to continue to apply pressure even when your opponent is using a control strategy. Xixorax’s largest weakness is that he loses high mobility in hyper, which means that even with his high damage potential he can sometimes get boxed in and unable to line up for the big power attacks other monsters can.

Karkinos (34.99)
With 10 health and Fireproof, Karkinos is easily the most sturdy monster on this list. The zombie lobster is an option for the player who isn’t interested in nuanced concepts like ‘positioning’ or ‘strategy’; she goes in, hits like a freight train, and can soak up just as much pain as she dishes out. Her Steamroller rule does allow for some tech play for a new player to grow into, but when your primary goal is to smash as much face as possible Karkinos is the cheddar bay biscuit and butter of the Destroyer arsenal. The major weakness in Karkinos’s kit to be aware of is that with an average defense stat and only 10 health, any monster that can make multiple attacks in a single turn, such as with a rule like Onslaught, can systematically disassemble her with little opportunity for counter-play from the Karkinos player.

Special Note – Megaton Mashup: Clash of Khans (74.99)
This box set comes with two monsters, Magma Khan for the Protectors Agenda and Ultra Cyber Khan for Destroyers. Magma Khan is a Fireproof monster with amazing power generation rules; in hyper, he gains two red dice every time he hits with an attack! Ultra Cyber Khan, on the other hand, is a highly technical monster with several actions that give him a robust toolkit with lots of opportunity for player skill expression. Both are fantastic monsters to start with, however, because they come packaged together, it may be a little pricey for a player looking to start on a limited budget. Maybe consider splitting the box with a friend?
STEP THREE: UNITS
For the purpose of this guide, we’re going to recommend you 4 unit packs per Agenda to get you to the full 20 units as efficiently as possible, while also providing some wiggle room for personal taste and suggestions on where to go from there once you want to expand. The short version here is that we’re looking for a good mix of units for the four archetypes: tough, high defense units that are good at securing buildings and objectives on your side of the board, fast units to take midfield objectives and easily reach strategic locations, units with strong attack stats and/or triggers for combat, and support pieces to enable your strategy.
It’s important to note that while certain monsters do benefit from having units from their own faction, the game is balanced with the intention that you use units from across your entire Agenda. You may be tempted, as a new player, to play either heavily or purely in one faction because you want your army to be thematic or visually cohesive, but we strongly recommend against doing this. Individual factions have massive weaknesses that the other factions in their Agenda are intended to fill; by playing faction-pure you’ll be leaving glaring flaws in your strategy and your first few games will be much less fun as a result.
PROTECTORS
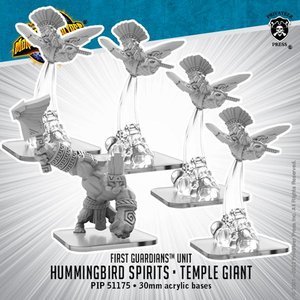
Hummingbird Spirit/Hummingbird Spirit Elite/Temple Giant (29.99)
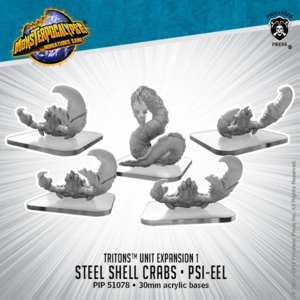
Steel Shell Crab/Steel Shell Crab Elite/Psi-Eel (29.99)
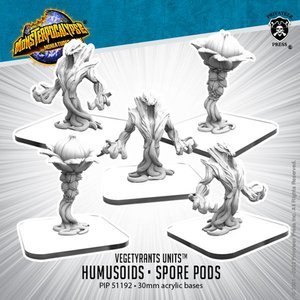
Humusoid/Humusoid Elite/Spore Pod (25.99)
Air Kami/Air Kami Elite/Fire Avatar (22.99)
Hummingbird Spirits are solid point holders with the very versatile Transpose action, which can be used to either shoot an allied unit up the board or steal a point from an enemy unit. The Temple Giant, on the other hand, is a premier securing unit with his Quorum special rule, while also sporting an impressive three-boost brawl stat with the Cleave trigger which lets him attack quite efficiently as well.
Steel Shell Crabs are among the best backline units in the agenda, with their 4 defense and Amphibious special rule making them top-in-class at securing buildings, and the Psi-Eeel is a fantastic specialist that brings a lot of tech to the agenda. Combined with the Temple Giant, this unit pack will form the backbone securing force of any Protector army.
Humusoids are a quirky unit. At first glance, they may appear to be quite weak, with below average speed, defense, and brawl stats. However, this is offset by their two very powerful special rules. Aggressive allows the Humusoid to move one space as soon as it’s spawned, which lets you use that spawn point again without spending an extra action die to bump. When combined with a Temple Giant, this lets you secure a building during the spawn phase using only one spawn point, which, if that building is a faction base, lets you take advantage of the base discount to get even more extra action dice out of your unit turn. In addition to this, when it dies its Invasive Species rule will replace it with another Vegetyrant unit in your reserves, making this a tough unit to crack even with its measly two defense. The Spore Pod, on the other hand, is another solid support unit that can help your monster reroll missed attacks and screen off with its Hop action.
The Air Kami is a potent attacking unit; the grunt’s Gathering Storm rule allows it to upgrade itself into an Elite when it attacks and then attack again using the same pool of action dice. It can be a complicated rule for new players, but it is extremely powerful. In addition, because these kami are the Air element, they can be spawned from the core set monster Hurricanius’s Spawning Locus. In addition, the Fire Avatar’s strong attacking stats and Fury trigger provide more good fighting options for your Protectors while also generating power dice. At only $22.99, this is a fantastic value pack.
Single Units: Command Ape, Clicker, Draken Berserker, Shadow Rider, Shadow Gate ($6.99-8.99 each)
Recently, Privateer Press added a section to their online store to buy individual units of certain highly sought after specialists. Although they do not come packed with a stat card, all of these are worthwhile purchases, as they often normally come packaged with a grunt unit that doesn’t see much play. Command Ape and Clicker greatly boost your units’ mobility with their Blitz and Tag rules, respectively, the Draken Berserker is the strongest brawling unit in the agenda, and Shadow Riders are solid support pieces for brawl-centric lists. The Shadow Gate is the most questionable inclusion here, as the Sun Fighter/Shadow Gate unit pack (listed below) might be worth picking up in its entirety.
These packs aren’t required right away, but once you’re ready to expand they’re a good first place to look:
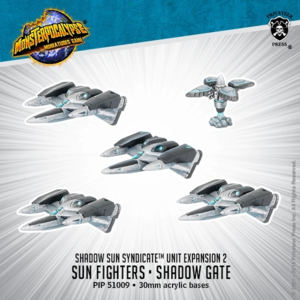
Sun Fighter/Sun Fighter Elite/Shadow Gate (24.99)
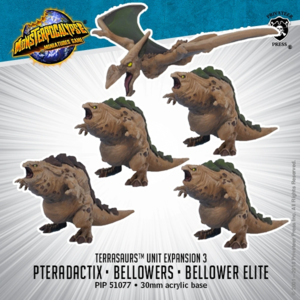
Bellower/Bellower Elite/Pteradactix (27.99)
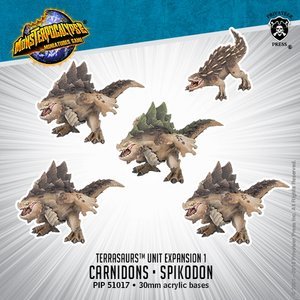
Carnidon/Carnidon Elite/Spikodon (27.99)
Sun Fighters are powerful but niche point holders whose 7 speed, 2 defense, and Flight make them great at taking forward power points. However, their gun is completely worthless (why this unit has an Elite is a mystery) and their role can also be filled by Stalkers, making them a solid but not necessary pickup. The Shadow Gate is a potent specialist, but its power is only really unlocked when combined with the Interceptor, a unit who is unfortunately the only playable piece in its pack. Competitive lists will want both, but for the budget conscientious it’s more of a grey area.
Bellowers are tough little dinosaurs with their 3 defense and Disrupt ability, making them good at forward building secures where they have the potential to bleed dice off your opponent’s attack rolls. They also have an average gun, so while they’re not fantastic at attacking, they can get the job done in a pinch. Pteradactix’s Tow action is useful for depositing your slow, bulky units where they need to be.
Carnidons, while slow, boast the single most accurate brawl attack of any one-cost unit in the game. They are a fantastic include for any brawl focused Protector list, or if you decided to pick up Tyrranix as your partner monster, as they benefit from his Combat Coordination and Boiling Blood buffs. The Spikodon is more niche as a specialist but still has a decent 2-boost gun with the Explosion trigger.
DESTROYERS
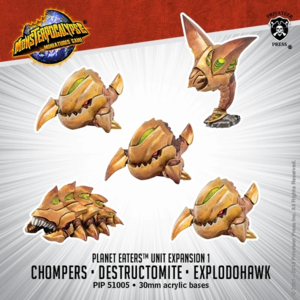
Chomper/Chomper Elite/Destructomite/Explodohawk (23.99)
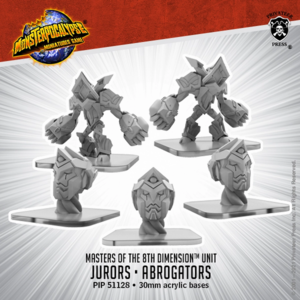
Jurors/Abrogator (29.99)
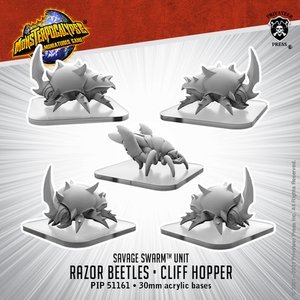
Razor Beetle/Razor Beetle Elite/Cliff Hopper (22.99)
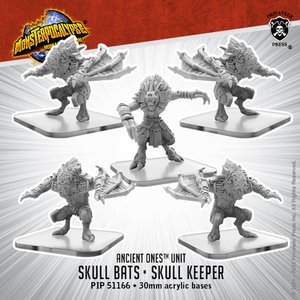
Skull Bat/Skull Keeper (25.99)
With their insane brawl stat, decent body, and powerful attack trigger, Chompers were once the premiere frontline brawling unit in Destroyers. Although meta shifts have dulled their stardom recently, they are still perfectly viable models. The Destructomite gives the Agenda cheap access to the powerful Flank ability, and the Explodohawk is a fantastic crowd control piece. Add this to the fact that this unit pack is one of the cheapest in the game and you have the most efficient power to dollar purchase you’ll ever make in Monpoc here. It’s not uncommon to see all five of these units continue to hit the table even at the highest level of play.
While they may be expensive to spawn, the Juror and Abrogator pack brings a ton of technical prowess to a new Destroyer player’s army. The Juror’s high defense and Quorum ability make them a natural pick for your main securing unit, while the Abrogator will generate power for your monster on both offense and defense with its Power Sink and Power Gorge rules. Like the Chomper pack, even a fully fleshed out list can justify running every unit in this pack simultaneously.
While Razor Beetles are slightly outclassed by Crawlers as the premier 4 defense securing unit in Destroyers, Razor Beetles come four in one pack, while Crawlers are specialists, making this pack a good consideration for players on a budget. In addition, all of the units in this pack benefit greatly from the Destroyers’ starter monster Dynastavus’s Dominant Species buff, making this pack a great pick-up if you’re planning on running with her long-term.
Skull Bats are useful point holders who can use their Abduct action to remove key enemy units without requiring a dice roll on an attack, while also boosting their allies’ attacks with Scout. However, the real key player in this unit pack is the Skull Keeper specialist. The Skull Keeper has a unique Action called Death Gate that does not require you spend any dice to use; instead, this unit can destroy itself to move another allied unit up to 3 spaces. This extra movement can be critical for getting your attacking units across the board to attack the enemy power base!
Single Units: Crawler, Destructomite, Task Master, Mollok Berserker, Spy Fly ($5.99-$8.99)
Much like the single units for Protectors, these are all highly desirable specialists. Because the Spy Fly and Destructomite are already included in the Destroyers starter and the Chomper pack already discussed, respectively, you can safely skip those as a new player, but we highly recommend picking up 2 Crawlers and 1 each of the Task Master and Mollok Berserker. Crawlers are 4 defense, immune to the Swat power attack (both halves!) and always benefit from cover while on an objective space, making them the strongest 1 cost securing unit in the entire game. In addition to those, Task Masters and Mollok Berserkers are potent attackers who both can remove two enemy units from the board with one attack with their respective Fling and Berserk triggers.
These packs aren’t required right away, but once you’re ready to expand they’re a good first place to look:
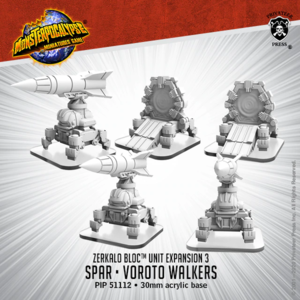
SPAR/Vorota Walker (24.99)
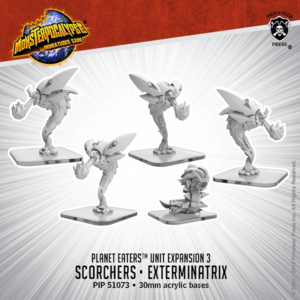
Scorcher/Scorcher Elite/Exterminatrix (34.99)
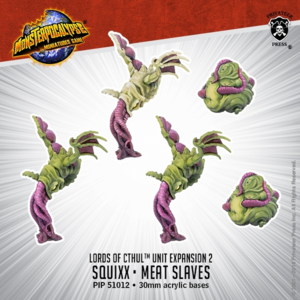
Squix/Squix Elite/Meat Slave (27.99)
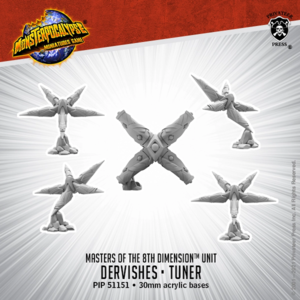
Dervish/Dervish Elite/Tuner (24.99)
SPARs are an interesting case. When building a Destroyer army, you’re generally going to want to invest in focusing on either brawl or blast attacks; for the purposes of this guide we made recommendations based on the brawl core, but if blasting speaks to you more SPARs are the most important piece of the Destroyer gun game. Vorotas are a low-mid tier unit, but the rockets are what’s important in this pack.
If you do decide to pursue a blast focused list, your next purchase should definitely be the Scorcher/Exterminatrix pack. The Scorchers don’t have a particularly impressive gun on their own, but they do come with the powerful Ignite action, which can potentially score you a free damage if the opposing monster stands in the wrong place. The Exterminatrix is a powerhouse in a blast focused list; its Demolisher and Devastation rules let it rip through enemy power bases and generate mountains of power dice if backed up by SPAR support.
The Squix is a highly versatile point holder that can control the midfield with its high speed and mobility, while also disrupting opponents with its aptly named Disruption ability. Meat Slaves are marginal outside of certain specific Cthul monsters, but the Squixes more than cover for them. One recommendation: there’s little to no reason to ever run an Elite Squix, so feel free to convert that third model into another Grunt by putting him on a different base.
The Dervish and Tuner pack give you an excellent mix of attack and point holder units. The Dervish sports high speed and decent mobility, and its powerful Momentum rule can allow it to throw ludicrous amounts of boost dice, especially when participating in a combined attack with other units. Because Momentum only looks at the total number of action dice in a roll, not how many the Dervish itself contributes, if a Dervish participates in a brawl with two other units and the total attack uses six action die, the Dervish will add six boost dice to the attack all on its own! If that wasn’t enough, this pack also includes the excellent Tuner specialist, who is a bundle of unique, techy abilities. It is worth noting that Dervishes don’t reach their full power level without assistance from a Facilitator, another Masters unit; however, because the Facilitator is a specialist packaged with the very underwhelming Voider unit, it isn’t included in this guide.
STEP FOUR: BUILDINGS
The starter box comes with 6 cardboard Apartment Buildings, and while technically an official army only needs 6 buildings to be tournament legal, the fun of the game really begins when you have a full city. Because buildings can be taken by either Agenda, the list here is mostly the same regardless of which starter you picked.

Reclamation Facility (19.99)
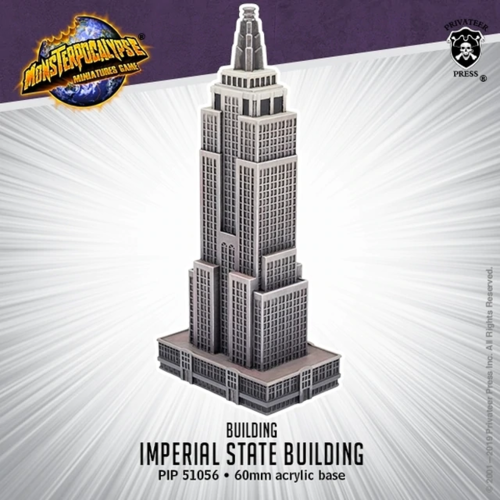
Imperial State Building (22.99)
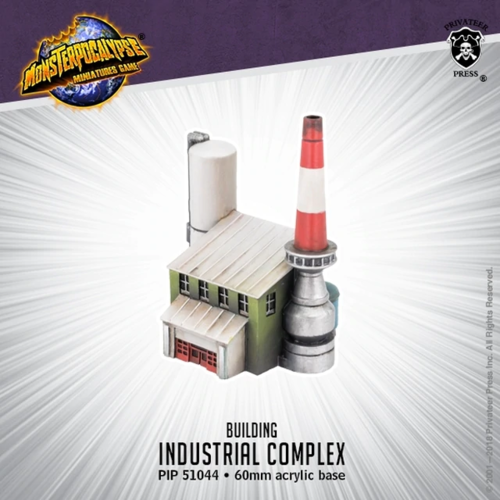
Industrial Complex (12.99)
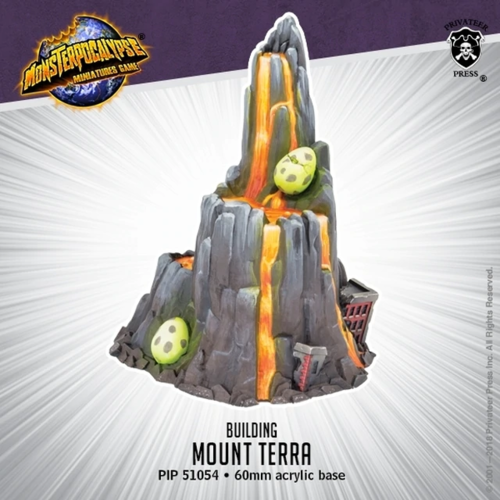
Mount Terra (18.99)
Myriad Singularity (21.99)
Although some of these buildings are Faction bases, meaning they have an ability to give a spawning discount to a certain faction, they are not considered part of that faction and can (and should) be played in any list, regardless of Agenda. For example, the Reclamation Facility brings two amazing abilities to your games that any army can benefit from, in addition to being the Zerkalo Bloc Base. Deconstruction gives you extra power dice for destroying buildings, rewarding you for plays you want to be making anyway, and the Recycle action is absurdly versatile, allowing you to remove enemy units from the board outside of the attack phase (even during monster turns) as well as removing enemy screens. Mt. Terra’s Tectonic Shift action is similarly important, as it is the only way to move a monster during your unit turn, often saving you from an otherwise unavoidable attack. The Myriad Singularity’s Ephemeral rule allows models without high mobility to walk right through it, which can be invaluable if your monster pair features pedestrians. Regardless of your monster pairing, as you play the game more you’ll find these four buildings will always be the first you reach for when building a list.
For the last two slots, we recommend choosing a faction base building that fits with your Agenda or personal taste. Almost all of them are strong options that you’ll get a lot of mileage out of, with the exception of the Jungle Fortress. Here are a couple standouts:
G.U.A.R.D. Defense Base (19.99)
Harbinger Comet Shard (16.99)
World Clock ($19.99)
Outreach Center (21.99)
-----
All together, these lists will run you around $300 depending on which options or add-ons you’ve included, assuming you’re buying everything at full price. This will give you a solid foundation to build great lists from for the rest of your Monpoc journey.