
Map Analysis Series: Obliteration Boulevard [Gearbox]
The instructive images in this article are captured from the free Tabletop Simulator mod by Tekk which you can subscribe to here.
Hello again and welcome. I’m Gearbox and I’m here to help you go from casually tossing monsters around the board to playing MonPoc competitively. This is the fifth article in a series analyzing all the maps released for Monsterpocalypse. In today’s article I’m going to walk through an analysis of the Monsterpocalypse map Obliteration Boulevard. I recommend reading my articles on Power Bases and Vectors before you dive into this article.

Released in May 2020 as a neoprene-fabric map, Obliteration Boulevard was instantly noted for its central area. This central area, with a negative zone in the center and 8 buildings surrounding it, became known as “The Thunderdome.” Two monsters enter, one monster leaves.
Challenging to maneuver on, fun to play on, and uniquely laid out to encourage a laning structure not seen on other maps, Obliteration Boulevard is a great map to play Monsterpocalypse on.
Foundations, Clutter, and Spawn Points
With 22 foundations laid out in its distinctive three lane pattern, the early game on Obliteration Boulevard can feel very hemmed in. However, once a building or three goes down, the map opens up quite a bit and becomes easier to maneuver around on.
Note how the buildings form 2 concentric rings around the center negative zone. This formation means that the majority of the buildings are on the edge of the map and require an extensive investment of power dice to Throw your opponent’s monsters into them.
Obliteration Boulevard is great for high mobility monsters that can jump between each of the three “lanes” down the center or sides of the map. Monsters without high mobility (pedestrians) want to charge down the center of the map into The Thunderdome so that they have the most room to maneuver and influence the outcome of the game.
There are only 5 spawn points and they are reasonably spread out along the backline. The most important one is the middle spawn point, since its units will be needed to secure not only the Middle power zone, but also both potential backline double building secures.
The power zones
The 8 power zones on Obliteration Boulevard are currently the largest collection on any MonPoc map. They’re also relatively spread out, forming two lines roughly six squares apart. This means that the only two power zones that can be swatted into each other are the ones in the Thunderdome. Note that a unit on the negative zone can be swatted into the power zones just outside of the Thunderdome as well. Hopefully the below diagram of what can be swatted where helps.

Potential Power Bases
I hope you like those power zones, because when it comes to securing buildings Obliteration Boulevard is not where it’s at.
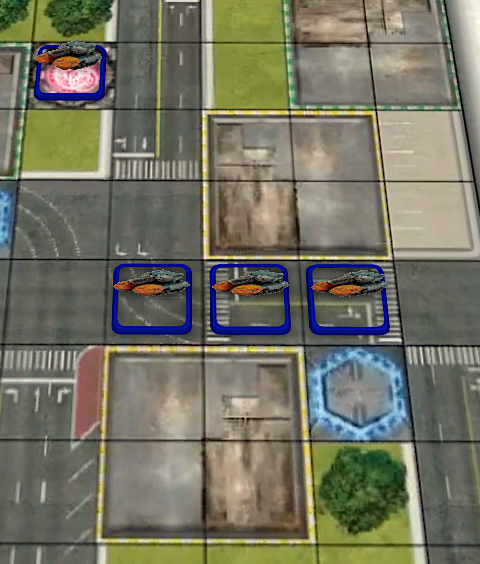
On the left side we have an Offset Alleyway Double with a nearby, almost Safe power zone. Note that the power zone unit can be swatted into any of the 3 building securing units.

In the middle of the map we have a single foundation and a Middle power zone within four squares of a spawn point. Here, again, we can see that any of the 3 units securing a building below can have the power zone unit swatted into them.

On the right side of the map we have another Offset Alleyway Double. Even though it’s connected to an Offset Double, I don’t think that you should try to secure the green foundation here; it’s too exposed and too far from spawn zones. As usual on Obliteration Boulevard, the power zone unit is in range for a swat into any of the building securing units.
This means we’re going to be relying on those Middle power zones for most of our power ups. Including the far right one that’s only 6 high mobility squares away from the rightmost spawn point.

There is a possible secure using the impassible water space in the Thunderdome, but seizing these two buildings is the height of arrogance. Only try to pull this off when you’re miles ahead on territory.

Alley-Oop Vectors
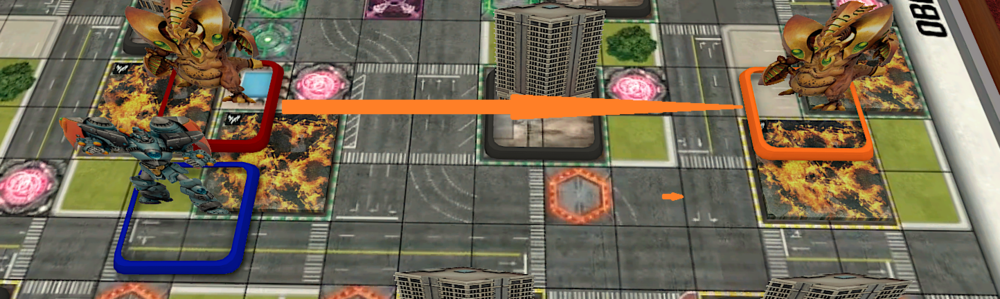
Remember that anything done on your side of the map can be done on your opponent’s side and vice versa. Also remember that Vectors can be reversed, if done properly. In the examples below, Red Goghadra will be where the enemy lands from the initial attack, Defender X will be where you can position your second monster, and Orange Gorghadra will be where the enemy finally lands. There are seven key Alley-Oop Vectors to discuss on this map:
The Central Building. Four of these Alley-Oops are centered on a single building! If you can drop your opponent’s monster onto the single building foundation that defines the corner of the Thunderdome, you can drop them onto any one of the four double foundations in line with that building. For as little as 4 power dice, you can land an amazing Alley-Oop if you can drop them onto this central building.

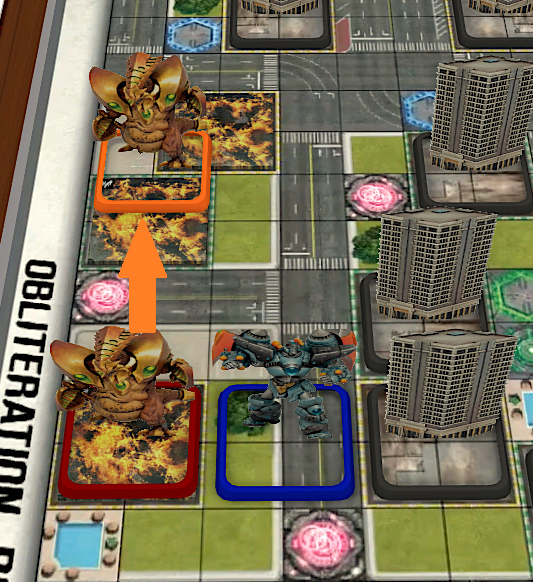
The Double into Double. If you can somehow manage to throw your opponent 9 squares on the second attack, then you can land them on two double foundations in a single turn as shown below.
The Backline into Double. If you can drop your opponent onto the inner building of the Offset Alleyway Double, then you can Throw them onto either of the double foundations on the corner of the Thunderdome. This takes a minimum of 4 power dice.

The Sideline. The only other Alley-Oop worth mentioning is on the sideline. If you can drop your opponent’s monster onto the yellow foundation on the left side of the board, you can then throw them into a double foundation with only 5 power dice. This is likely to be rare, but worth remembering.
Final Thoughts
COMPETITIVE PLAYERS MUST BE COMFORTABLE ON ALL MAPS. Half the time, your opponent is going to choose the map, so you need to be ready to play on all of them. Everything after this line is just Gearbox's opinion, and should not be taken as the last word. In fact, many competitive players vehemently disagree with the below opinion.
Obliteration Boulevard is a unique, fun map. The opening of the game usually centers around body slams in the Thunderdome. I highly recommend considering monsters that have Grappler, a range 5 blast attack, and/or high mobility if you want to make this map your go to choice.
There’s a lot of fighting over the middle of the map, both for monster positioning and power zone clearing. This emphasis on constant battle really encourages a solid game of tempo management. Take too many monster turns and your opponent will seize all the territory they can with their units; take too few and your monsters are getting Alley-Ooped all over the board.
All in all, Obliteration Boulevard is a good map for competitive play. I don’t recommend it for two pedestrian monsters, but overall it’s a good map with some very unique flavor. I recommend picking it up for at least practice, since it’s likely you’ll see it played by other competitive players. Remember to always walk your tankiest monster into the Thunderdome for maximum obliteration!
Have fun!
-Gearbox